DIY Lingerie Project: Simple Embroidery to Decorate Your Intimates
Hand embroidery is more than just stitching motifs on fabric. It can be a relaxing, meditative practice, perfect for calming anxiety when you have a bit of time on your hands. With COVID-19 keeping much of the world inside, many of us have a lot of time on our hands, and a lot of anxiety.
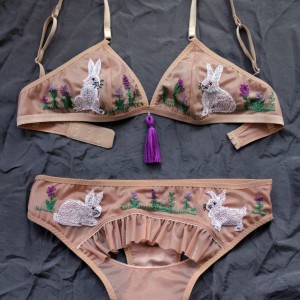
Luckily, lingerie is the perfect canvas for this dainty embellishment technique, filled with tiny stitches and careful details.
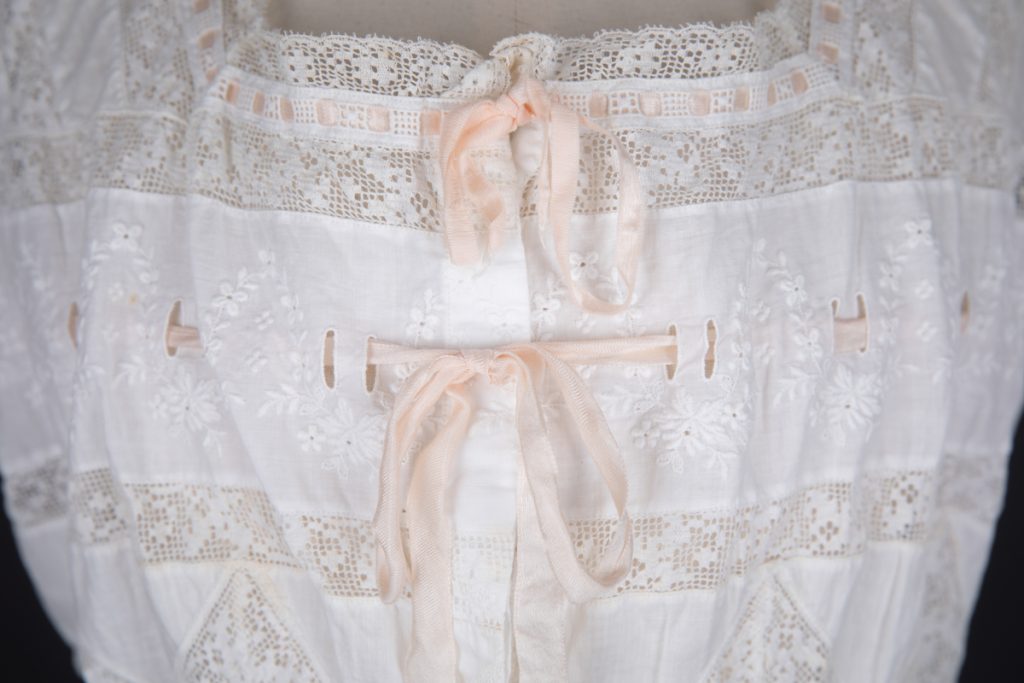
An incredible example of whitework embroidery on a late 1800s cotton corset cover, via The Underpinnings Museum. Photographed by Tigz Rice, 2018
Although it has been years since my last embroidery project, I've found myself turning to my hoop to help settle my mind during this trying time. It's so satisfying to create something beautiful out of nothing more than a length of thread.
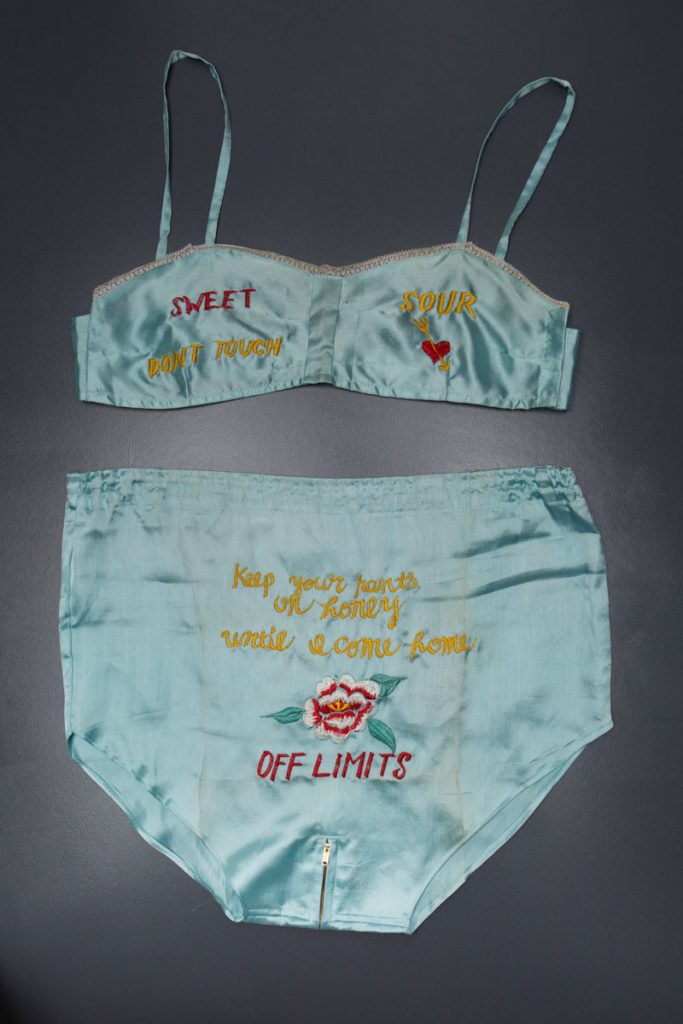
Embroidered Rayon WWII Souvenir Lingerie Set via The Underpinnings Museum. Photography by Tigz Rice
Lingerie designers and home sewers have turned out stunningly detailed, technically perfect embroidery for decades. But you don't need to be an expert seamstress to try it out yourself. With that in mind, I've created a tutorial utilizing a pattern and three basic stitches, so you can embellish your lingerie in quarantine and beyond.
Gather Your Embroidery Materials
- Something to stitch on. For your first practice, I recommend something like a woven hand towel or piece of scrap fabric, rather than your favorite knickers.
- Embroidery floss. Beautiful floss is fun, but the cheap stuff is fine. Wash it first, if you plan on washing whatever you embroider.
- This pattern is made for a length of 4mm ribbon, silk or otherwise. If you don't have this, you can skip it.
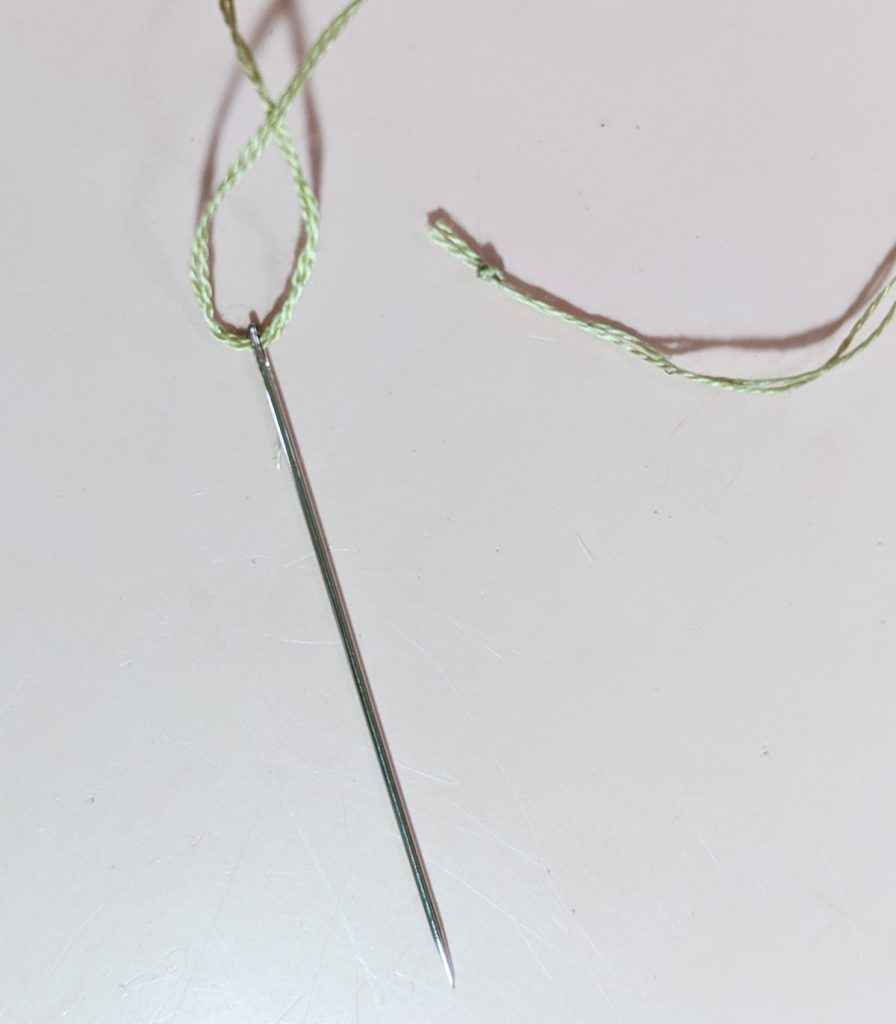
- A needle. If you don't have an "official" embroidery needle, that's OK. You just need something with an eye big enough for a few strands of embroidery floss.
- An embroidery hoop. This makes things way easier, but you can make the stitches without a hoop if you don't have access to one.
- Scissors
- Something to mark with, like a disappearing fabric marker, or even a pencil.
Prep Your Fabric
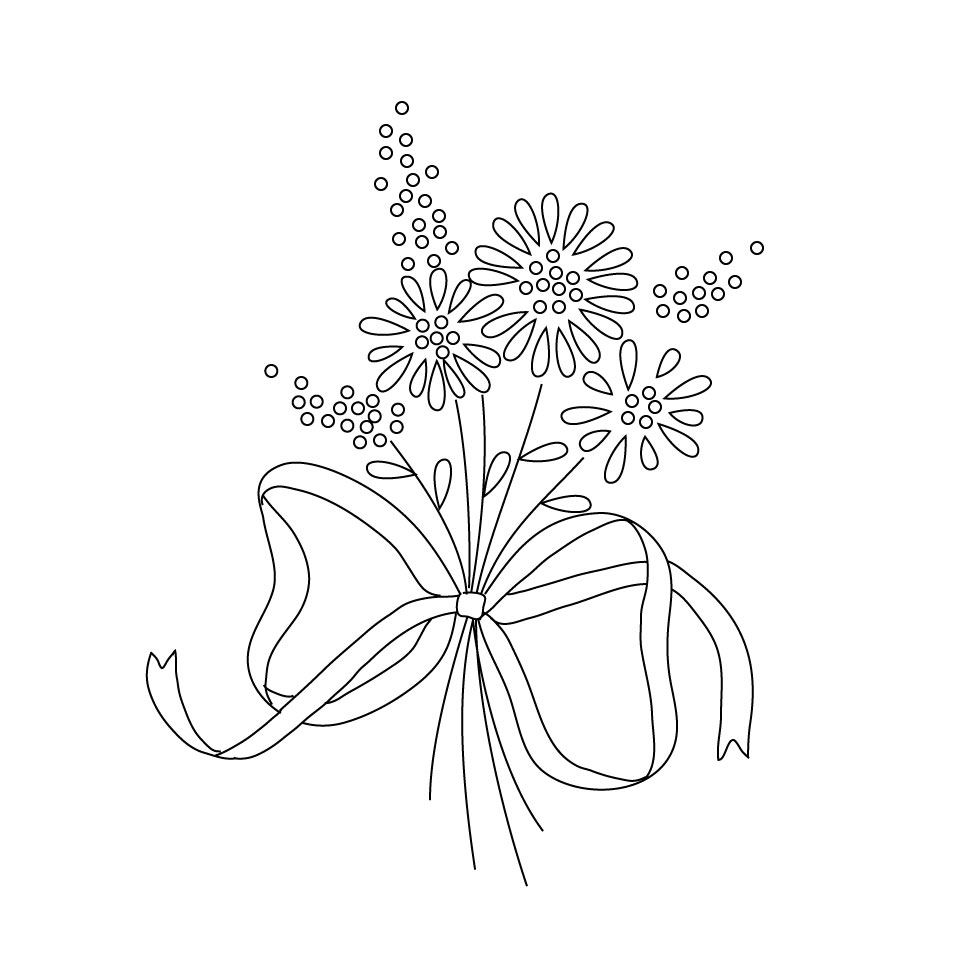
Embroidery Pattern, copyright Quinne Myers. For personal use only.
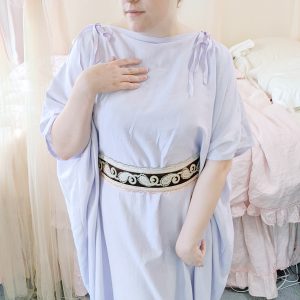
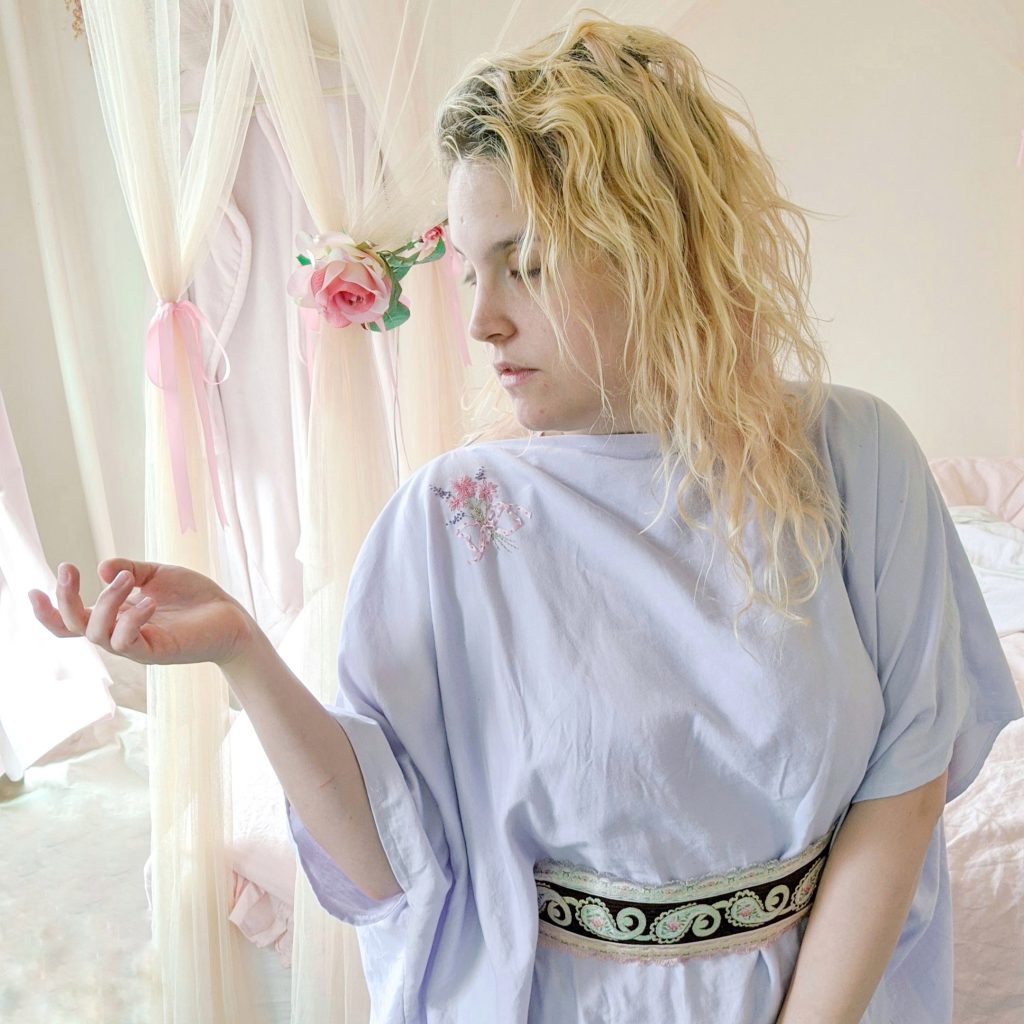
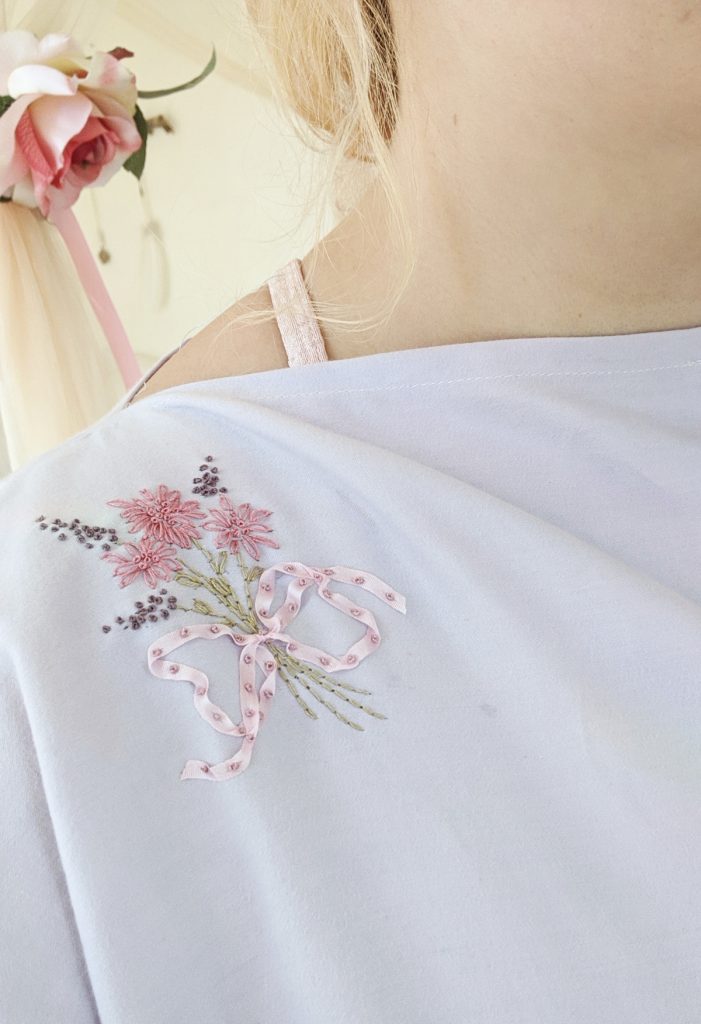
I've created an embroidery pattern for this tutorial. This romantic bouquet was inspired by the frilly pink cherry blossoms that are finally starting to bloom in NYC, as well as the textural grape hyacinths popping up in front yards across my neighborhood right now. These little things bring me lots of joy on my walks, and I wanted to memorialize them with this project. I think it would be cute on a pair of tap pants, a camisole, or even a robe pocket. I'll be using the caftan from my previous tutorial!
If you'd like to follow this sample pattern, you'll need to transfer it onto your fabric. Feel free to print out the pattern and use a marking tool to trace it onto your fabric (here are some tips!). Or you can just hold your fabric up to your screen and trace it that way. A pencil isn't ideal, but I've used one here because most of us are in quarantine, and I'm assuming you don't have any fancy tracing items!
You're free to trace the pattern exactly as is, but I like to simplify it, especially if I'm using a pencil or other marking tool that isn't guaranteed to disappear. For the bow, I drew one line down the center of the ribbon. For any "petals," I put one dot at the top and bottom of the petal.

If you have an embroidery hoop, open up the two circles and place the center of your fabric between them. Place the two circles back together and tighten them. Your fabric should be pulled snug between the hoop, not as tight as a drum, but not sagging. If you need to tighten it, loosen the circles of the hoop slightly and pull the fabric evenly, with and across the grain.
If you don't have a hoop, try to keep the fabric stable between your non-dominant hand and another surface, like your thigh or a table. Imagine writing a letter on a piece of paper floating in the air, versus lying flat on a table. One is way easier than the other, right? The same applies for embroidery. Keeping your fabric "flat" will help your work turn out cleaner.
For your thread, cut a piece about 12"-18" long. This is the general length I use for all projects. If your thread is too short, you'll have to keep cutting a new piece; Too long, and it'll be hard to handle, get tangled, or even turn fuzzy from being pulled through the fabric so often.
If you're using classic 6-ply embroidery floss, pull apart 2 of the strands to create a thinner floss. Tie a double knot at the end of your thread.
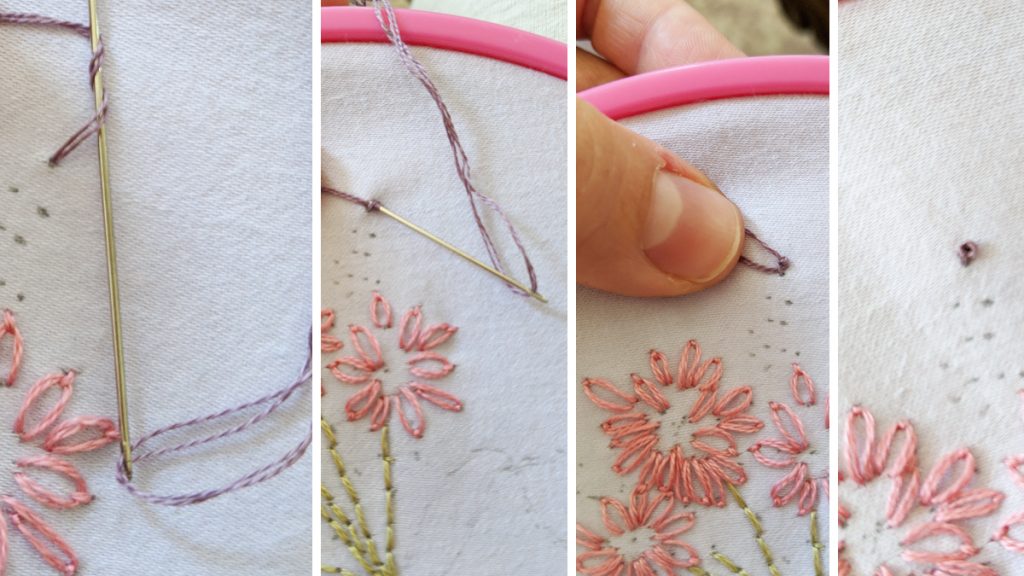
Stitch #1: Back Stitch
This "solid line" stitch is useful for writing words and drawing outlines.
Come up from the back of your fabric at the start of your traced line for the "stems." Take a scant 1/4" stitch along the line, then come up another 1/4" away without pulling your needle through to the back.

Pull the thread through, then go back down where your needle initially came down. Repeat the stitch, making even 1/4" stitches along the line.
To simplify: You're basically making backwards stitches to create a continuous line.
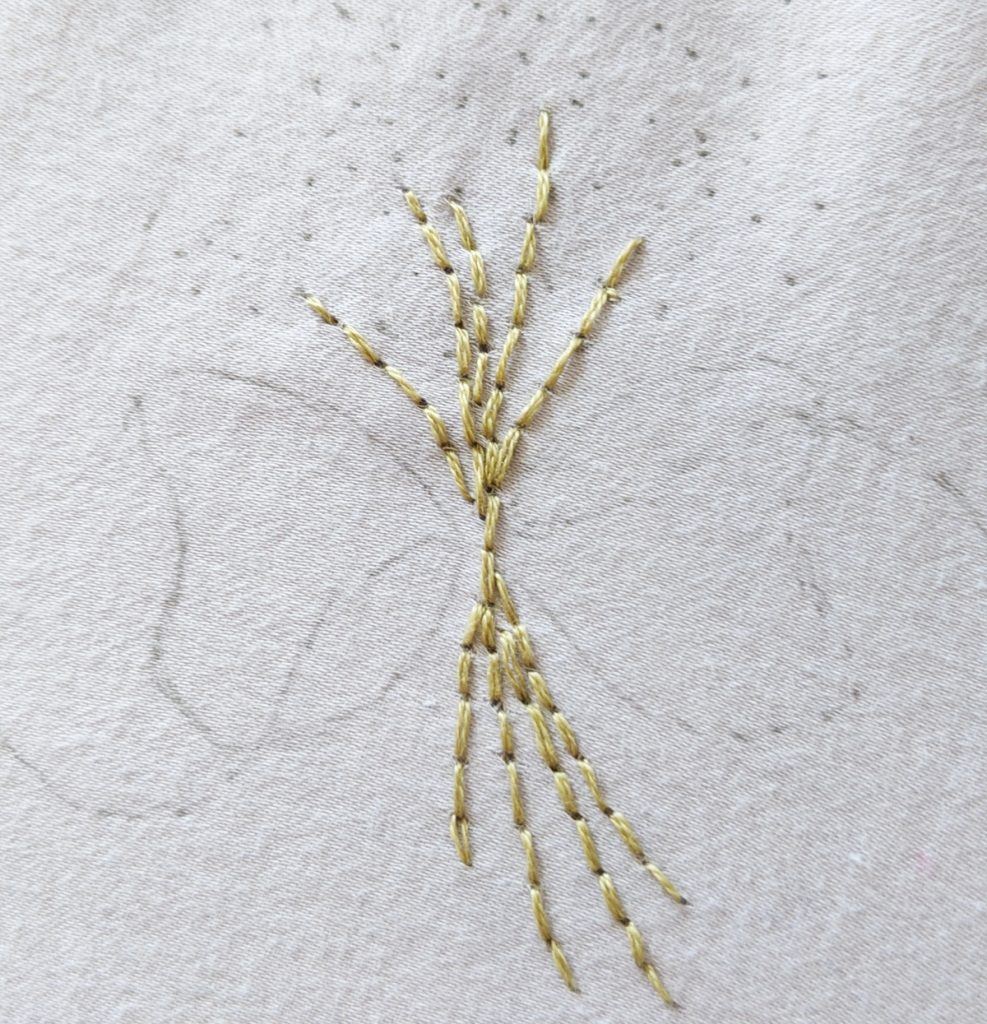
Once you reach the end of the line, tie a knot on the back and clip your thread. Before making the knot, you can take a tiny stitch of the fabric along the line of your embroidery for more security.
Stitch #2: Chain Stitch/Daisy Stitch
This stitch is my favorite because it's so versatile! You can create a lovely thick chain line, or separate the "links" out to make leaves, flowers, or raindrops. We'll be using the separate "links" for the flowers and leaves in the pattern.
Bring your needle up through the back of the fabric at the inner tip of one petal. Push the needle back through the fabric just to the right of the thread, and bring it up at the outer tip of the petal. Guide the thread around the tip of your needle, and pull the needle through. You'll have a nice little loop. Finally, "lock" the loop in place by piercing your needle back through to the back, creating a stitch over the loop you just made.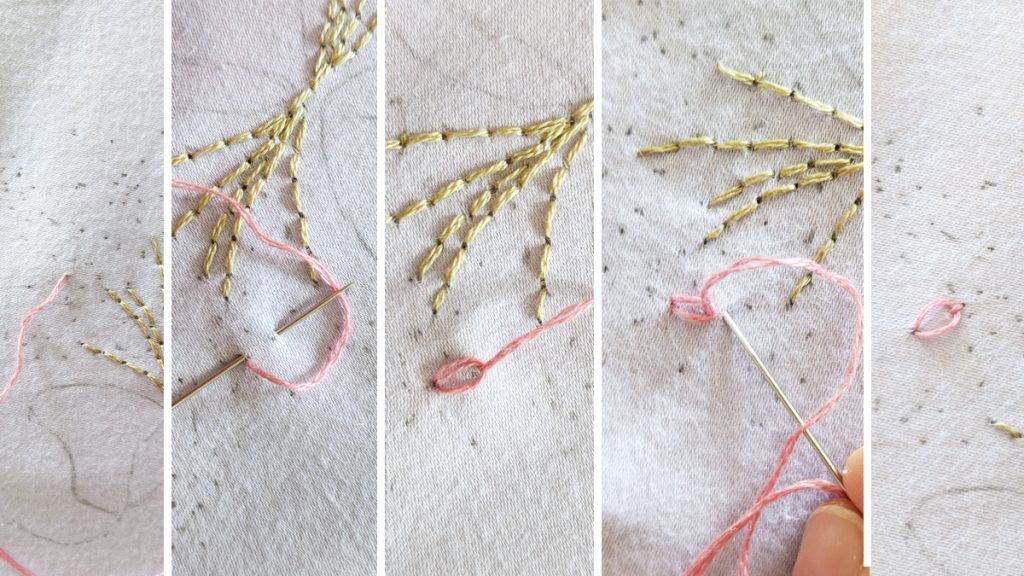
Repeat for every petal on the flowers. You'll use this technique on the leaves as well, but sometimes I like to wait until the piece is almost done to add them and make sure they're in a nice spot.
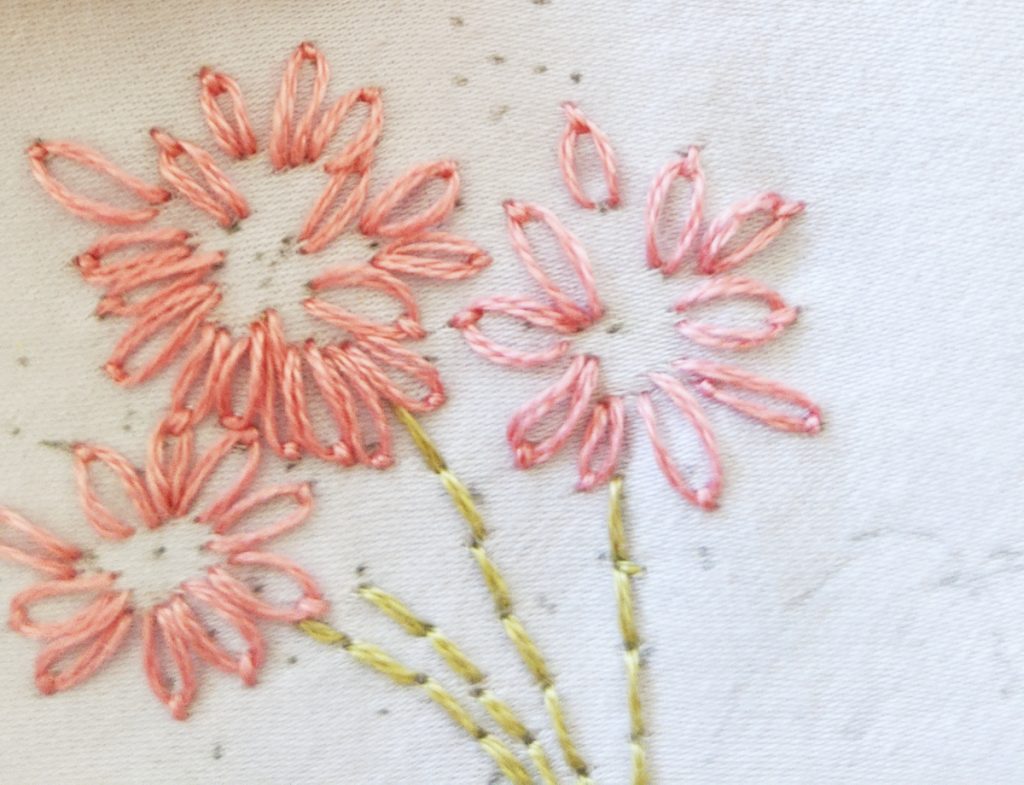
As you can see, I'm not striving for couture-level perfection with this piece! But if your petals come out uneven and you want them to be perfect, feel free to pull them out and redo them.
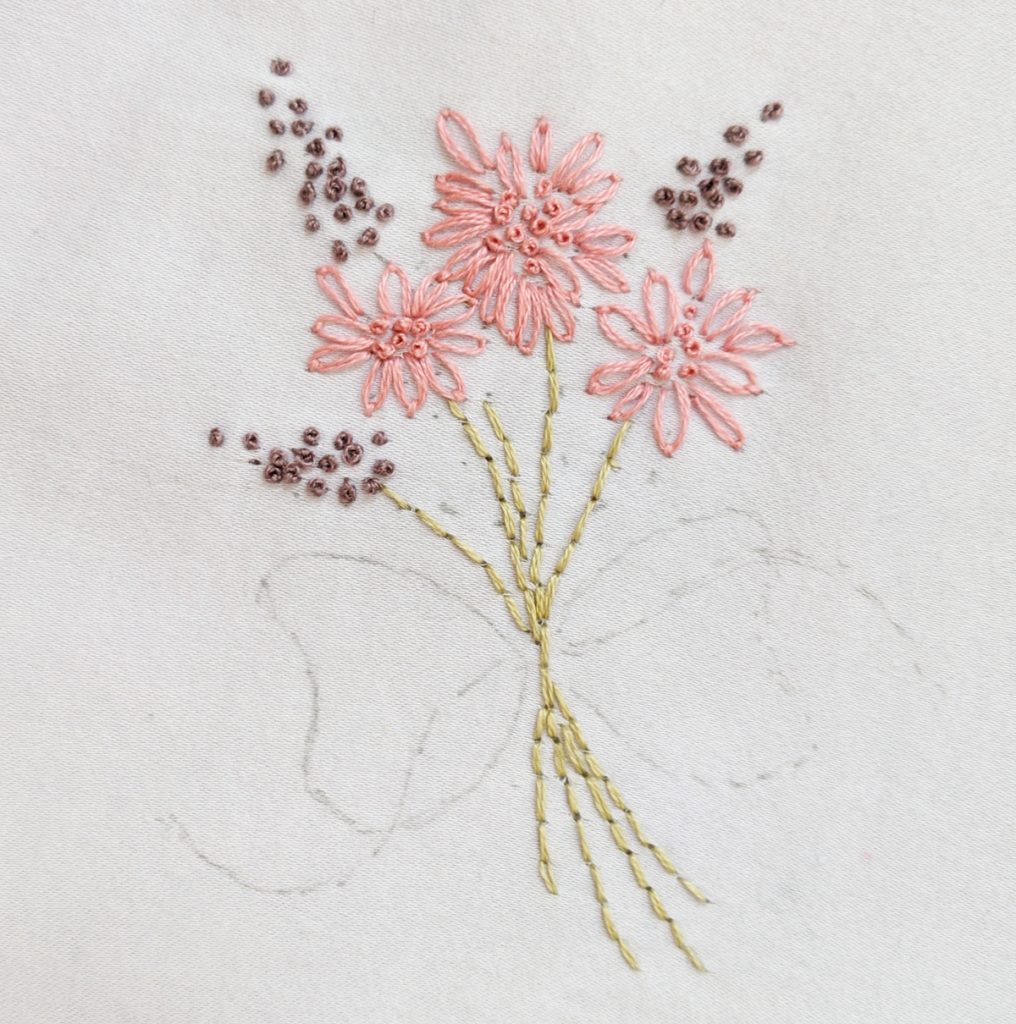
Stitch #3: French Knot/Couching
This stitch is the trickiest of the three, but once you get it down, it's so satisfying. The French knot creates cute little 3D "dots" on your fabric, creating flower centers and sentence punctuation. It can also be used to couch ribbon, like the bow on this pattern!
To make a knot, come up through the back of your fabric with your needle and pull the thread tight. Holding the thread tight in your non-dominant hand, wrap it around the needle twice. Pulling the thread tight while it's wrapped around the needle, push the needle back down through the fabric just next to the thread's first exit point. Keep the thread tight as you pull the needle all the way through.
This takes a bit of practice to get the tension right (and, as you can see, is not easy to do with one hand while taking photos). But when you nail the technique, it creates a dainty little knot on the top of your fabric. Repeat over every dot on the pattern.
You can also use French knots to attach things like ribbons to your fabric, which is know as "couching." Tie your ribbon into a bow to match the pattern. You can pin the ribbon down to the pattern lines for ease, or just hold it down as you go along. Starting in the middle, come up through the fabric and ribbon with your needle and thread, and create a French knot right on the center of the ribbon.
Continue along the loops and tails every 1/4", tacking them down along the pattern lines with your tiny French knots. The best part of this technique? Even if it's not perfect, it will look beautiful and organic.
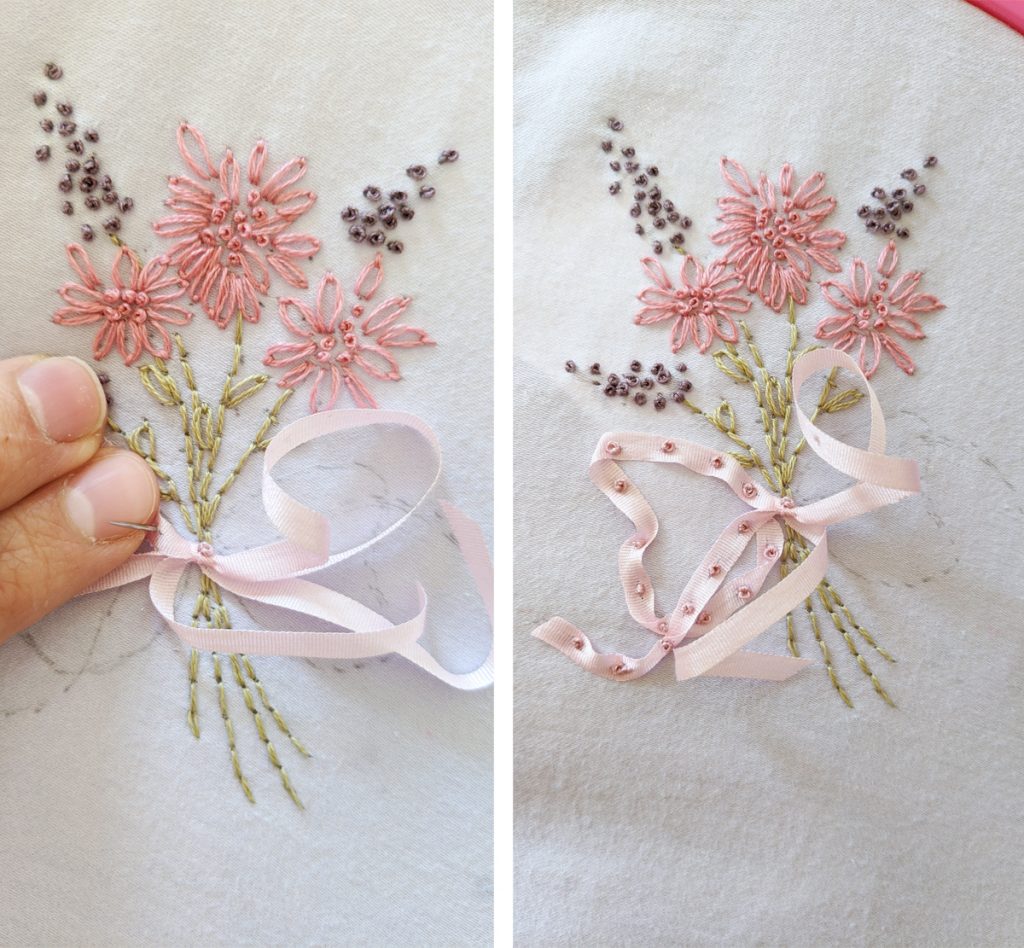
If you don't have a ribbon, you can use your back stitch to "draw" the outlines of the ribbon instead.
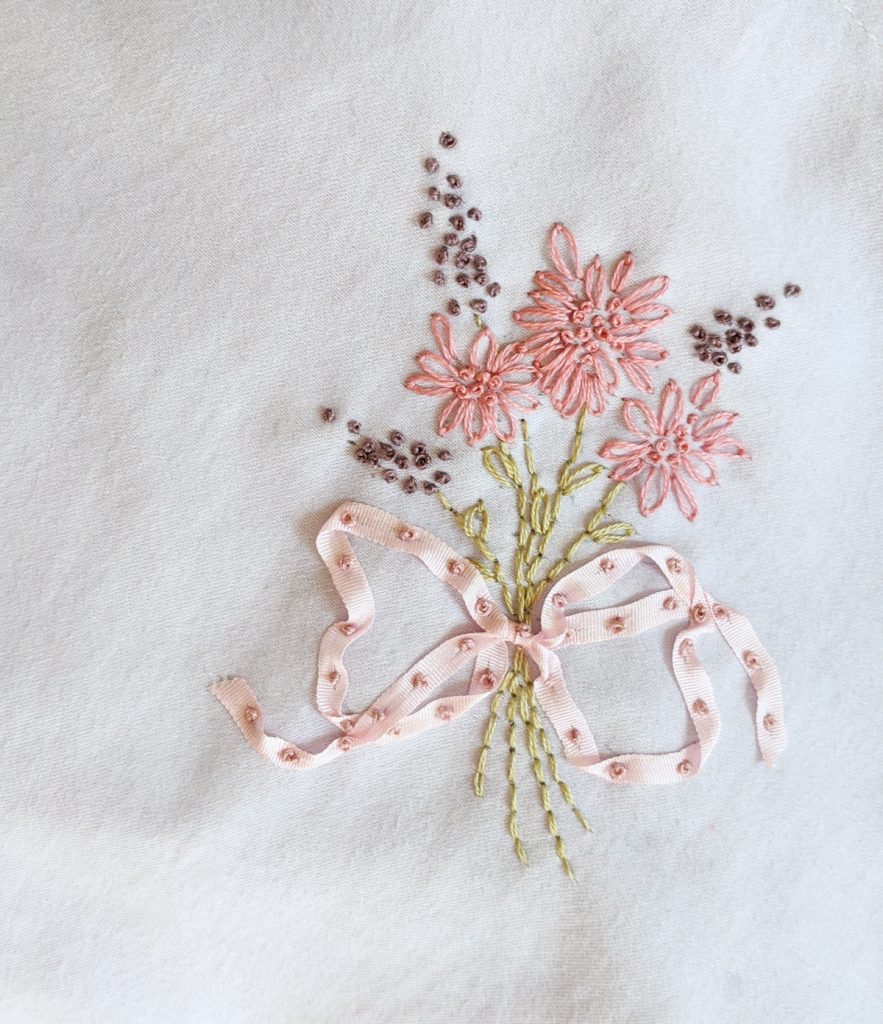
And you're done!
Tips for Embroidering on Lingerie
It's pretty straightforward to embroider something like a woven cotton caftan, but other types of lingerie require special handling.
Stretch fabric can be tricky to stitch on, and I wouldn't recommend it for your first project. Instead, try embroidering a pair of woven tap pants or a non-stretchy robe. If you do want to try embroidering a knit fabric or another fabric with a lot of stretch, buy tearaway stabilizer (for thicker fabrics) or water-soluble stabilizer (for thinner fabrics). Baste it to your garment before you put it in your hoop for an easy-to-stitch "canvas." You don't need stabilizer, but it will help you make a cleaner design more easily.
If you're embroidering on sheer fabric, you'll be able to see the back of your stitches through the material. Tying off your thread more often, rather than criss-crossing the back of your design with your threads while you work, will help keep it looking neat.
If you're embroidering on lace, remember that your knots might slip through larger openings in the fabric. Ensure every stitch you make has enough material to catch onto.
Many embroiderers don't knot off their threads after they finish, preferring to finish off the stitch differently so the back of the fabric is more flat. I think this is great for heirloom pieces, but if you're planning on wearing and washing your lingerie after embroidering it, I do recommend knotting your threads as I do in this tutorial. I usually take a teeny tiny stitch on the back of my garment where I want the knot to be, and then tie a square knot, tight and close to the fabric.
If your lingerie is too small for your hoop, you can baste a piece of organza to its edge, creating a larger surface to stretch into your hoop.
Show it Off!
I hope learning these simple stitches will help you stretch your creativity and create a little beauty in your life during isolation! If you have questions, feel free to ask below and I'm happy to help out.
If you use my embroidery pattern on your lingerie, tag me @itsquinne and The Lingerie Addict @thelingerieaddict on Instagram. Or share your embellished intimates to the Lingerie Addicts Facebook group. We'd love to see it!